Monday, December 31, 2012

Robotium to test Android List views

Lists in Android present multiple line items in a vertical arrangement. They can be used for data selection as well as drill down navigation.

Robotium provides various functions to test Android Lists. the following are some of them,

  • clickInList(int line)
  • clickLongInList(int line)
  • scrollUpList(int index)
  • scrollDownList(int index)
  • scrollListToTop(int index)
  • scrollListToBottom(int index)
  • scrollListToLine(int index, int line)
Let us see the Usage of the functions with the following example project, which contains a listview with the items from 'Product1' to 'Product19'. 


let us see the usage of the APIs with a Test case

Test case for Android List views:

Steps:
  1. Click on the products list, select 'Product 1', it will open a blank activity. click on Back button to back to list view.
  2. select 'Product 7' from the list and go back to list view
  3. scroll down the list and select 'Product 8' from the list and go back to list view
  4. select 'Product 11' from the list and go back to list view
  5. scroll up the list and select 'product 6' from the list and go back to list view
Test code :
public void testNewProducts() throws Exception {
    //select 'Product 1'
    solo.clickInList(1);
    assertTrue(solo.waitForText("Product 1 selected"));
    solo.goBack();
    
    //select 'Product 6'
    solo.clickInList(1);
    assertTrue(solo.waitForText("Product 6 selected"));
    solo.goBack();
    
    //scroll list to line 7
    solo.scrollListToLine(0,7);
 
    //click on 'Product 8'
    solo.clickInList(1);
    assertTrue(solo.waitForText("Product 8 selected"));
    solo.goBack();
    
    //scroll list to line 10
    solo.scrollListToLine(0, 10);
    
    //select 'Product 11'
    solo.clickInList(1);
    assertTrue(solo.waitForText("Product 11 selected"));
    solo.goBack();
    
    //select 'Product 7'
    solo.scrollListToLine(0, 6);
    solo.clickInList(1);
    assertTrue(solo.waitForText("Product 7 selected"));
    solo.goBack();
    
    //select 'Product 2'
    solo.scrollListToLine(0, 1);
    solo.clickInList(1);
    assertTrue(solo.waitForText("Product 2 selected"));
    solo.goBack();
}


Explanation:


  1. Click on Products list : 'solo.clickInList()', is used to select the list item with a given index (index starts with 1)

    • If you see the first image shown above, the list contains seven items from 'Product1' to  'Product 7' having index from 1 to 7. To select 'Product 7' in the list, use 'solo.clickInList(7)'
    • please note, to select 'Product 8', you can not use index 8.

      • If you see the first image shown above, the list contains seven items from 'Product1' to  'Product 7' having index from 1 to 7.
      • Since 'Product 8' is not listed in the screen, you have to scroll the list to down, to do this use 'solo.scrollDownList()' or use 'solo.scrollListToLine()' to scroll to a give line.
      • After scrolling down, the first item in the list will be assigned index1 and so on..
      • See the second picture shown above, which shows list after scrolling down the list, contains items from 'Product 8' to 'Product 14'. Now, to select 'Product 8', use index of 1 and to select 'Product 14', use index 7.
      • in our example project, it will display a Toast message on selecting a list item, which can be used to assert true/false.

Using Robotium to test Android “Text Fields”

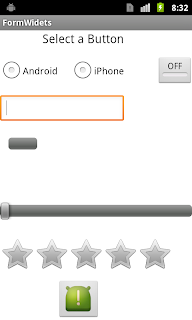
Robotium supports various functions to test Android single and multi line text fields.
The following are few APIs supported by Robotium to test the Text Fields,
  • searchEditText(String text)
  • clickOnEditText(int index)
  • clearEditText(int index)
  • typeText(int index, String text)
  • enterText(int index, String text)
Let us write a test case for the Sample project shown on the right side,

Test case for verifying the Text Fields :

Steps :
  1. Wait for the activity to launch
  2. Enter a text in the Text Field
  3. Verify the text entered in the Text Field
  4. Clear the Text Entered in the Text Field
  5. Enter a new Test again and Verify the text entered.
Test Code:
   1: public void testEditField() throws Exception {

   2:    solo.waitForActivity("MainActivity");

   3:             

   4:    solo.clickOnEditText(0);

   5:    String strInput = "Sample code 1";

   6:    solo.enterText(0, strInput);

   7:    boolean actual = solo.searchEditText(strInput);

   8:    assertEquals("text entered is not matching",true, actual);

   9:  

  10:    solo.clearEditText(0);

  11:    strInput = "Sample code 2";

  12:    solo.typeText(0, strInput);

  13:    actual = solo.searchEditText(strInput);

  14:    assertEquals("text entered is not matching",true, actual);

  15:  }

Explanation:
  1. solo.waitforActivity( ), is to wait for the activity to launch

  2. Enter Text in the Text Field :  to enter a text in the Text filed, both ‘solo.enterText()’ and ‘solo.typeText()’ can be used.

  3. in ‘enterText(int index, String text)’,  index is the index of the Text Field.

    • if multiple Text Fields exists, first one will be assigned an index of 0, second one will get an index 1 and so on..  index increases from Top to Bottom or Left to Right

    • Verify the Text Entered :  to verify the text contained in the Text Filed, ‘solo.searchEditText()’ can be used. it returns True, if pattern matches otherwise return False

  4. Clear the Text in the Text Field : to clear the Text exist in the Text Field, ‘solo.clearEditText()’ can be used.

  5. ‘assertEquals()’, can be used to assert True/False

Using Robotium to test Android Toggle Buttons

Robotium supports various APIs to test Android Toggle Button functionality

the following are some of the APIs supported by Robotium to test the Toggle Buttons

  • searchToggleButton(String text)
  • clickOnToggleButton(String name)
  • isToggleButtonChecked(int index)
  • isToggleButtonChecked(String text)
Let us write a test case for the Example project shown on the Right side, which has one toggle button

Test case for testing Toggle Button :

Steps:
  1. Search for the Toggle Button
  2. Assert True/False based on the search result
  3. Click on the Toggle Button
  4. Check if Toggle Button status is changed or not?
  5. Click on the Toggle Button again
  6. Check whether the Toggle Button status is changed or not?
Test code:

   1: public void testToggleButton() throws Exception {

   2:     solo.waitForActivity("MainActivity");

   3:  

   4:     //search for toggle button

   5:     actual = solo.searchToggleButton("OFF");

   6:     assertEquals("Toggle Button not found",true, actual);

   7:  

   8:     //Turn ON toggle button

   9:     solo.clickOnToggleButton("OFF");

  10:     actual = solo.isToggleButtonChecked(0);

  11:     assertEquals("Toggle Button is OFF",true, actual);

  12:  

  13:     //Turn OFF toggle button

  14:     solo.clickOnToggleButton("ON");

  15:     actual = solo.isToggleButtonChecked(0);

  16:     assertEquals("Toggle Button is ON",false, actual);

  17:              

  18: }
Explanation:
  1. Search for Toggle Button : ‘solo.searchToggleButton()’ is used to search for toggle buttons in the current activity

    • the functions returns ‘true’ if the Toggle Button with the given string is found otherwise return ‘false’

  2. Click on the Toggle Button : ‘solo.clickOnToggleButton()’ is used to click on Toggle Button with the given string

    • on enabling the Toggle Button, it’s text is changed from “OFF” to “ON”. hence, second time we modified the search pattern to “ON”

  3. Check the Status of Toggle Button : ‘isToggleButtonChecked()’ is used to check the status of Toggle Button

    • argument passed can be a String or Index
    • returns true if the toggle button is checked, otherwise, return false.

Use Robotium to test the Android Spinners

Spinners in Android, provide a quick way to select one value from the set. in most cases it looks like a drop down menu with several items in the list.  Robotium provides the following APIs to test the Spinners functionality,
  • getCurrentSpinners()
  • isSpinnerTextSelected(int index, String text)
  • isSpinnerTextSelected(String text)
  • pressSpinnerItem(int spinnerIndex, int itemIndex)
to know how to use these functions, let us write a sample test case and test code for the Project shown below, which has a Spinner to select month, contains list of months from January to December.

First image is the one before selecting the Spinner and the second is after selecting the Spinner. 

Test case for Spinners :

Steps :
  1. Select the Spinner item
  2. From the List select ‘January’
  3. Verify the status of selected spinner item
  4. Select the spinner item ‘July’ and ‘December’ and verify their status.
Test Code :
   1: public void testSpinner() throws Exception {

   2:     solo.waitForActivity("MainActivity");

   3:     boolean actual = solo.searchText("Select a Button");

   4:     assertEquals("Select a Button Text not found",true, actual);

   5:         

   6:     //click on Image Button

   7:     solo.clickOnImageButton(0);

   8:     assertTrue(solo.waitForText("Image Button is selected"));

   9:                     

  10:     actual = solo.searchText("Select Month");

  11:     assertEquals("Spinner text not found",true, actual);

  12:             

  13:     //select spinner item January

  14:     solo.pressSpinnerItem(0, 1);

  15:     actual = solo.isSpinnerTextSelected(0, "January");

  16:     assertEquals("spinner item January is not selected",true, actual);

  17:             

  18:     //select spinner item March

  19:     solo.pressSpinnerItem(0, 2);

  20:     actual = solo.isSpinnerTextSelected(0, "March");

  21:     assertEquals("spinner item March is not selected",true, actual);

  22:             

  23:     //select spinner item May

  24:     solo.pressSpinnerItem(0, 2);

  25:     actual = solo.isSpinnerTextSelected(0, "May");

  26:     assertEquals("spinner item May is not selected",true, actual);

  27:             

  28:     //select spinner item July

  29:     solo.pressSpinnerItem(0, 2);

  30:     actual = solo.isSpinnerTextSelected(0, "July");

  31:     assertEquals("spinner item July is not selected",true, actual);

  32:             

  33:     //select spinner item Octomber

  34:     solo.pressSpinnerItem(0, 3);

  35:     actual = solo.isSpinnerTextSelected(0, "Octomber");

  36:     assertEquals("spinner item October is not selected",true, actual);

  37:             

  38:     //select spinner item September

  39:     solo.pressSpinnerItem(0, -1);

  40:     actual = solo.isSpinnerTextSelected(0, "September");

  41:     assertEquals("spinner item September is not selected",true, actual);

  42:             

  43:     //select spinner item November

  44:     solo.pressSpinnerItem(0, 2);

  45:     actual = solo.isSpinnerTextSelected(0, "November");

  46:     assertEquals("spinner item November is not selected",true, actual);

  47:             

  48:     //select spinner item December

  49:     solo.pressSpinnerItem(0, 1);

  50:     actual = solo.isSpinnerTextSelected(0, "December");

  51:     assertEquals("spinner item December is not selected",true, actual);

  52: }

Explanation:
  1. Select Spinner Item : spinner item can be selected by using the function ‘solo.pressSpinnerItem()’. Spinner contains months from January to December.

    • to select Spinner item “January”, index starts with 0

    • if we want to select Spinner item “March”, it’s index will not be 3. Please note that, the index calculation in Spinners will be different from the other items.

    • Spinner item index is calculated based on Current Spinner item selected.  In this case, since our current item selected is ‘January’,  to select the item ‘March’, we need to move our position to two steps forward, this can be achieved by using ‘solo.pressSpinnerItem(0,2)’. in this statement first argument is for the Spinner, second argument is the reference to spinner item i.e. ‘March’

    • at this step, our present selected item is ‘March’. Suppose, if we want to select ‘February’, we have to move a step backward by index of ‘-1’. this can be achieved by using ‘solo.pressSpinnerItem(0, -1)

    • Now you are at “February”, if you want to go to “May”, your statement will be ‘solo.pressSpinnerItem(0, 3)

  2. Verify the Spinner item selected : this can be achieved by using the statement ‘solo.isSpinnerTextSelected()’, which returns a boolean value either true or false.

Robotoum to test Android Toast Messages

Toasts in Android are the small popup appear on the screen, used to provide feedback about an operation. Robotium supports various functions to detect the Toast messages appear on the Screen.
  • searchText(String text)
  • waitForText(String text)
these functions helps in detecting the Toast messages appear on the screen.

Let us see the usage of these functions with the help of a test case for the example project shown on the Right side. 
Right side shown is the second activity in the Example project1. there are three checkboxes present, on selecting the checkboxes and clicking on ‘Submit’ button will show toast message on the screen.

Test case for detecting Toast Message:

Steps :
  1. go to second activity in the Example Project1 by clicking on the Image button (the picture is not shown here..)
  2. in the second activity, select Checkboxes ‘Android’ and ‘Windows’ and click on ‘Submit’ button
  3. detect the Toast Message appear on the screen
  4. Assert True/False, based on the toast seen
Test code :
   1: public void testToastMessages() throws Exception {

   2:     solo.waitForActivity("MainActivity");

   3:     boolean actual = solo.searchText("Select a Button");

   4:     assertEquals("Select a Button Text not found",true, actual);

   5:             

   6:     //click on Image Button

   7:     solo.clickOnImageButton(0);

   8:     assertTrue(solo.waitForText("Image Button is selected"));

   9:         

  10:     //look for submit button

  11:     actual = solo.searchButton("Submit");

  12:     assertEquals("Submit Button not found",true, actual);

  13:             

  14:     //select two checkboxes and click on submit and look for the Toast

  15:     solo.clickOnCheckBox(0);

  16:     solo.clickOnCheckBox(1);

  17:     solo.clickOnButton("Submit");

  18:     assertTrue(solo.waitForText("Android and Windows are Selected"));

  19: }

Explanation:


  1. ‘solo.clickOnImageButton()’, is used to click the Image button appearing in the first screen. on click this image button, it will go to second activity that is shown in the above example

  2. Detect the Toast Message: toast Message can be detected using ‘solo.searchText()’ or by using ‘solo.WaitForText()’.

    • ‘solo.searchText()’ is used to detect the Toast Message appearing on the screen, which returns a boolean value true/false.

    • ‘solo.waitForText()’ is used to wait until the message appears on the screen, which is more helpful function while working with Toasts.  If text is found on the screen, returns true otherwise return false.

    • in the above example, there are two Toast messages appear, one is on clicking Image Button and other on selecting the Checkboxes and clicking on ‘Submit’ Button.

  3. Button : ‘solo.searchButton()’, is used to look for a Button with a given text

    • ‘solo.clickOnButton()’, is used to click on the Button appearing with a given text or index.